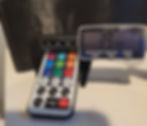
After printing out the Disney Mickey Globe, it dawned on me that the puck light that I used had a remote control that could potentially be lost. To prevent this, I thought of how I would want to store the remote. Luckily, the base for the globe has plenty of space to stash the remote.
The problem? The base is round, the remote is rectangular. Square peg, round hole.
The solution? Make a square hole in the round hole!


Import Base File Into tinkercad
To begin, go to tinkercad and create an account if needed or sign in.
Click on Create new design.
Click on Import.

Click on Choose a file.

Browse to the Base file on your computer, open it and then click on Import.
I keep the defaults. If you need to purchase the Mickey Christmas Globe Lithophane, you can click here.

The Base will import on its side. You will need to rotate it so that the Base is sitting upside-down.
The easiest way to do this is to rotate the view to the Left view by clicking on the cube in the top right corner.
Next, click on the Base object to select it. Your screen should appear similar to the image below.
To rotate the Base, click on the rotation icon, which is shown in red below, top center under the square.

Rotate the Base 90 degrees counter-clockwise, or so that the bottom of the Base if facing up.

The Base is floating in the air. You want to click on the black cone on the top and drag it down until it sits flat on the Workplane.

Measure Your Remote
To make sure the Base has the correct size for the remote to fit, you will need to measure your remote. The best way to do this is to use a caliber. You need to measure length, width, and height.
TIP I'm using millimeters for my measurements, and that is what tinkercad is set to as well


Jot down the measurements and round up. This will accommodate for shrinking and allow a proper fit for the remote.
TIP To ensure the height of the remote is correct but also will rise above the Base shape later, add .5mm to the height.
Making the First Cut
We are now ready to start making the cuts that are needed.
Select the Box shape from the right-side panel.

Click on the Workplane to add the box. Adjust the dimensions of the Box shape by clicking on one of the white boxes. You can then click on the default size of 20.00 and type in the new dimensions you want to use.


Reposition the Box shape by dragging it to the Base and center the shape on the base. Since the Box shape is flat on the Workplane, you will need to use the cone to drag the shape up and sit it so that the Box sits just above the Base.

It is important that the Box shape shows above the Base slightly.
Next, we need to group the Box shape with the Base. This will cut out the Box shape from the Base.
Click on the Box shape, then holding the Shift key, click on the Base. Click on the Group button to create the cut.


Making the Second Cut
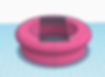
Having a rectangle shape cut out from the Base isn't enough. The remote would simply fall out. Next, we will add a circular cutout from the Base that will allow the remote to be rotated into to actually hold it.
For this second cut, we will need to use the Cylinder shape. Select the Cylinder shape from the right-side menu.

Click on the Workplane to add the cylinder. Adjust the dimensions of the Cylinder shape by clicking on one of the white boxes. You can then click on the default size of 20.00 and type in the new dimensions you want to use. In this case, I am using 98mm and 7mm thick.

Reposition the Cylinder shape by dragging it to the Base and center the shape on the base. To ensure that the remote can drop into the Base and be rotated to fit in properly, you will need to position the Cylinder shape just below the bottom of the Base itself.

Now we can make the second cut. Group the Cylinder shape with the Base. This will cut out the Cylinder shape from the Base.
Click on the Cylinder shape, then holding the Shift key, click on the Base. Click on the Group button to create the cut.

Export and Print
Congratulations! The Base has now been modified to fit the remote. To print this, you will need to Export it from tinkercad by clicking on the Export button, then choosing STL and saving the file.
You can then open the STL in your favorite slicer. The Base, without modification, could be sliced without supports. I would recommend using tree supports, touching build plate, for this. The object should be placed up-right (remote hole facing down) in the slicer. The supports will be easily removable, but you may need to use a file for some cleanup.
I hope you found this helpful! Happy printing!