"They have caged Shadowkiller" - from Lord of Chaos, book 6 of the Wheel of Time.
Shameless plug - I LOVE the Wheel of Time. I have read the entire series several times over and own all the audiobooks, and I cannot wait until Amazon releases the series in November. You can only watch it on Amazon Prime Video.
You can watch the trailer for the Wheel of Time here.
So why all the talk about Wheel of Time? Because that is the theme for this Box tutorial.
Box
A Box has a base and a lid.

The LuBan Box function can do so much more than making a simple box. However, we will only go over the basics of the Box function in this article. We will cover more advanced uses for it in a future article.
If you do not already have LuBan installed, check out the Extrusion article. The instructions are in the first part.
To make a Box in LuBan, you need to go to File -> Create -> Photo magic

Select Photo
Now you need to select a photo. For this example, I am using the one below.

TIP The color of the image - color vs. black and white - and what is black and white- impact the results.
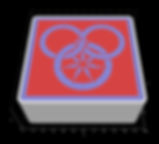
The logo I am using above will produce the lid below, which will raise the blue area (extruded).
I took a free image editor, gimp, and swapped the black and white to create this version of the image:

When I apply that image in LuBan for my Box, I get the lid below. For this lid, we can extrude the blue part or remove it altogether, leaving what is blue as a hole in the lid.

As you can see, this decision is yours as to what you think will look best for you.
Sizing your Box

The next step is to size the box. There are two options for this, Inner size and Outer size.
This option controls how the measurements below are applied to your box.
If you choose Inner size, then your Base size X, Y, and Z will be the interior size of your box. Changing the Inner Size is helpful if you design a box to hold a specific object and need it to be a particular size.
If you choose Outer size, then the Base sizes X, Y, and Z will be the outside measurements of your box.
TIP Measurements are in millimeters
TIP Press Enter after making a change to make it go into effect
Thickness
You can adjust this as needed
Lid Type
There are four different types of lid options you can choose from. Each one has a different impact on the overall design of the box and other functions.
Basic Lid
The Basic lid is a lid that slips over the base of the box. Think of something similar to a box you get with a new cell phone. The lid is kept in place by friction.

Twist Lid
The Twist lid is similar to the Basic, but it adds... a twist! This type of lid creates a twisted shape which adds to the friction to keep the lid more secure.

Flat Lid
The Flat lid is really cool. It just sits on top, but LuBan makes it unique because you can customize the lid by adding pre-made magnet holes, set to the size of your magnets, so you can add magnets to the box and lid to keep it secure.

Inlay Lid
The Inlay lid creates the lid, but it sets in the box.

Inner Pattern
Now that you have your box image selected and the lid type chosen, you must decide what Lid Pattern to use.
This feature allows you to be a bit more creative with your box. For my examples, I will use the Inlay Lid type and change the Inner pattern. The results are the same for each type of lid.
Ignore
The Ignore option will do just that - it will keep the shape of the image used to make the box, but it will ignore anything that would show on the lid and make it a blank lid.

Extrude
The Extrude option will extrude the image on the lid, raising it on the lid. You can change the Pattern Depth to make the extrusion bigger, thus raising the image higher the higher you go. In this example, I used a Pattern Depth of 5 to show you the difference.

Indent
The Indent will take the lid design and separate it into two parts. The red part in the image below will be a separate file that you can print in a different color and then snap into place on the lid.

Hollow lid
The Hollow lid pattern removes the pattern from the lid. It will remove everything black in the original design. This is why I said you need to watch what your colors are.


Hollow Box
The Hollow Box will make the box hollow based on the pattern used. I had to switch up the photo I used for this example.


Nested Box
LuBan can create nested boxes. It will produce as many boxes that will fit without reducing further.

Edge Chamfer
This setting will allow you to set a chamfer size on the lid. In the examples below, the chamfer is set to 0 (none) and 4 (the highest since the thickness is set to 5)


Tolerance
This setting is used to set the tightness between the box and the lid. When the box and lid are printed, they may end up slightly larger than the object created in LuBan. You can set the Tolerance to make up for that, setting it to a negative number like -0.2.

Congratulations! You have now created your first box with LuBan!
There are many amazing things that Box function can do. Check out how to make a Custom Name Box using this feature!
Here is my completed box. This box itself was printed on a FLSUN Q5 using eSun Black PLA Pro +. In Cura, I used the default Draft profile. I used a .4 nozzle, 205/60. The lid was printed on a Creality Ender 3 with metal extruder, yellow springs, BTT SKR mini 3 v2 control board, and eSun Silk Silver PLA. In Cura, I used the CHEPV4.7 Best profile. I used a .4 nozzle, 210/65.